There are multiple ways to create an spring boot project. We can use any of the following approach to create an application.
- Spring Initializer
- Spring Maven Project
- Spring Boot CLI
- Spring Starter Project Wizard
Here we will use IntelliJ IDEA to create project.
Developing First RESTFul Web Service with Spring Boot
In this post, We will discuss about how to create spring boot "Hello World" web application. We will build a service that will accept HTTP GET request at:
and respond with a JSON representation of a greeting:
You can customize the greeting with optional name string query parameter.
The name parameter value overrides the default value of "World" and is reflected in the response:
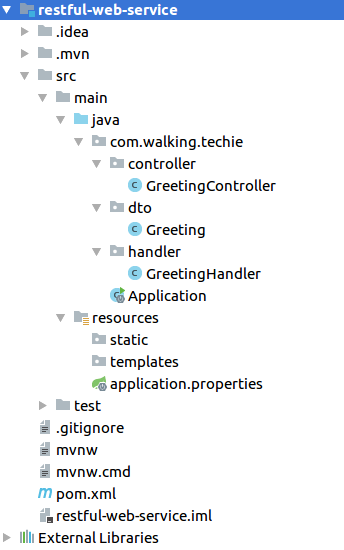
Project structure
This is a directory structure of the standard maven project.
Project dependencies
<?xml version="1.0" encoding="UTF-8"?>
<project xmlns="http://maven.apache.org/POM/4.0.0" xmlns:xsi="http://www.w3.org/2001/XMLSchema-instance"
         xsi:schemaLocation="http://maven.apache.org/POM/4.0.0 http://maven.apache.org/xsd/maven-4.0.0.xsd">
    <modelVersion>4.0.0</modelVersion>

    <groupId>com.walking.techie</groupId>
    <artifactId>restful-web-service</artifactId>
    <version>0.0.1-SNAPSHOT</version>
    <packaging>jar</packaging>

    <name>restful-web-service</name>
    <description>RESTFul web service with spring boot</description>

    <parent>
        <groupId>org.springframework.boot</groupId>
        <artifactId>spring-boot-starter-parent</artifactId>
        <version>2.0.3.RELEASE</version>
        <relativePath/> <!-- lookup parent from repository -->
    </parent>

    <properties>
        <project.build.sourceEncoding>UTF-8</project.build.sourceEncoding>
        <project.reporting.outputEncoding>UTF-8</project.reporting.outputEncoding>
        <java.version>1.8</java.version>
    </properties>

    <dependencies>
        <dependency>
            <groupId>org.springframework.boot</groupId>
            <artifactId>spring-boot-starter-web</artifactId>
        </dependency>

        <dependency>
            <groupId>org.springframework.boot</groupId>
            <artifactId>spring-boot-devtools</artifactId>
            <scope>runtime</scope>
        </dependency>
        <dependency>
            <groupId>org.springframework.boot</groupId>
            <artifactId>spring-boot-starter-test</artifactId>
            <scope>test</scope>
        </dependency>
    </dependencies>

    <build>
        <plugins>
            <plugin>
                <groupId>org.springframework.boot</groupId>
                <artifactId>spring-boot-maven-plugin</artifactId>
            </plugin>
        </plugins>
    </build>


</project>
application.properties
server.port=8081
Create a resource representation class
Greeting is a plain java class with fields, constructor, and accessors for the id and message. This class model greeting representation.
package com.walking.techie.dto;

public class Greeting {
  private final long id;
  private final String message;

  public Greeting(long id, String message) {
    this.id = id;
    this.message = message;
  }

  public long getId() {
    return id;
  }

  public String getMessage() {
    return message;
  }
}
Note: Spring uses the Jackson JSON library to automatically marshal instances of type Greeting into JSON.
Resource Controller
In Spring RESTFul web services, HTTP requests are handled by a controller. These controllers are easily
identified by @RestController annotation. Here We have created GreetingController
handles GET requests for /greeting, optionally with a name parameter in the
query string. The GET request should return a 200 OK response with JSON in the body that represents a greeting
by returning a new instance of the Greeting class.
package com.walking.techie.controller;

import com.walking.techie.dto.Greeting;
import com.walking.techie.handler.GreetingHandler;
import org.springframework.beans.factory.annotation.Autowired;
import org.springframework.web.bind.annotation.GetMapping;
import org.springframework.web.bind.annotation.RequestParam;
import org.springframework.web.bind.annotation.RestController;

@RestController
public class GreetingController {

  @Autowired private GreetingHandler greetingHandler;

  @GetMapping("/greeting")
  public Greeting sayHello(@RequestParam(value = "name", defaultValue = "World") String name) {
    return greetingHandler.greeting(name);
  }
}
The @GetMapping annotation ensures that HTTP requests to /greeting are mapped to the sayHello() method.
Greeting object will converted into JSON using the Spring's HTTP message converter support.
Business Logic
GreetingHandler service will create an object of Greeting. We have seperated out the actual logic of
greeting from the controller. So that controller will be clean and all business logic will be written on service
layer.
package com.walking.techie.handler;

import com.walking.techie.dto.Greeting;
import org.springframework.stereotype.Service;

import java.util.concurrent.atomic.AtomicLong;

@Service
public class GreetingHandler {
  private static final String template = "Hello, %s!";
  private final AtomicLong counter = new AtomicLong();

  public Greeting greeting(String name) {
    Greeting greeting = new Greeting(counter.incrementAndGet(), String.format(template, name));
    return greeting;
  }
}
Run an Application
Here we have created the standalone application. So then we package everything in a single, executable JAR file. When you run this jar file, It will deploy on the embedded tomcat server.
package com.walking.techie;

import org.springframework.boot.SpringApplication;
import org.springframework.boot.autoconfigure.SpringBootApplication;

@SpringBootApplication
public class Application {

  public static void main(String[] args) {
    SpringApplication.run(Application.class, args);
  }
}
@SpringBootApplication is a convenience annotation of @Configuration, @EnableAutoConfiguration, and @ComponentScan.
The main() method uses Spring Boot’s SpringApplication.run() method to launch an application. This web application is 100% pure Java and you didn’t have to deal with configuring any plumbing or infrastructure.
Build an executable JAR
You can run the application from the command line with Gradle or Maven. Or you can build a single executable JAR file that contains all the necessary dependencies, classes, and resources, and run that. This makes it easy to ship, version, and deploy the service as an application throughout the development lifecycle, across different environments, and so forth.
Here we are using the Maven, So we can run the application using ./mvnw spring-boot:run. Or you can build the JAR file with ./mvnw clean package. Then you can run the JAR file:
If you are using the Gradle, you can run the application using ./gradlew bootRun. Or you can build the JAR file using ./gradlew build. Then you can run the JAR file:


No comments :
Post a Comment